Things to know:
- You can use Stage Manger on macOS Ventura and iPadOS 16.
- To access Stage Manager on
- Mac – Open Control Center → Stage Manager.
- iPad – Control Center → Stage Manager.
During WWDC 2022, Apple introduced Stage Manager, a feature that will help you eliminate the headache of cluttered recent apps windows in macOS and iPadOS. But how to use the Stage Manager on your Mac or iPad and multitask like a pro?
For starters, you need to have macOS Ventura and iPadOS 16, plus you’ll have to enable it. This guide will help you understand and make the most of Stage Manager on both Mac and iPad, so let’s get started.
- What is Apple Stage Manager?
- How to use Stage Manager in macOS Ventura
- How to use Stage Manager in iPadOS 16
What is Stage Manager?
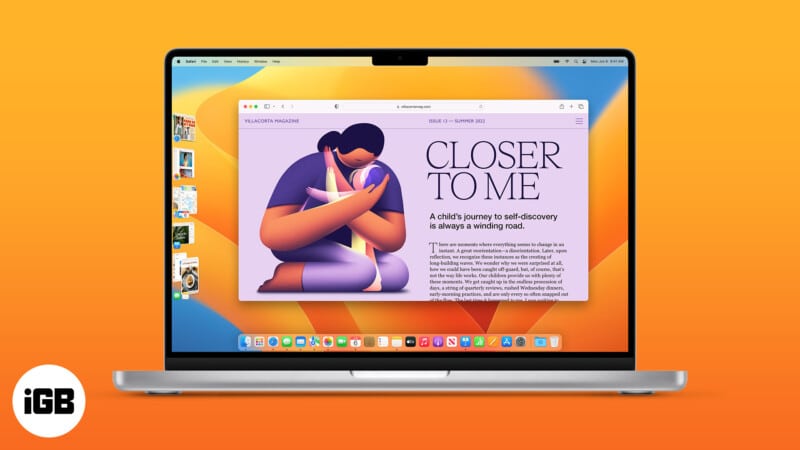
The Stage Manager is a multitasking feature for macOS and iPadOS. This feature better organizes the windows on your desktop so you can access them easily and enjoy a clutter and confusion-free desktop.
Users can drag and drop windows from the side over other apps to group them. While using Stage Manager, the window of the app you currently use will be displayed prominently in the center. In contrast, the other active apps windows are arranged on the left-hand side according to the recently used order.
The thumbnails show a live view of its window, allowing you to see updates, like incoming messages, without switching the app. You can view up to six thumbnails, depending on the size of your desktop.
How to use Stage Manager in macOS Ventura
While Stage Manager is available on all Macs running macOS Ventura (even the Intel ones), the feature is not enabled by default. So, before we get to the use, let’s first learn to enable/disable Stage Manager on Mac.
Turn the Stage Manager on or off
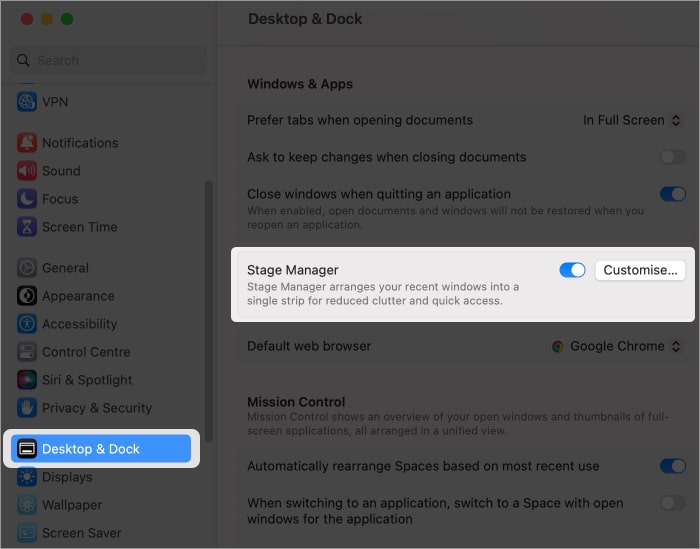
Via Settings
- Click the Apple Menu → select System Settings.
- Choose Desktop & Dock from the sidebar.
- Scroll down to Windows & Apps section (from the right-hand side).
- Toggle Stage Manager on or off.
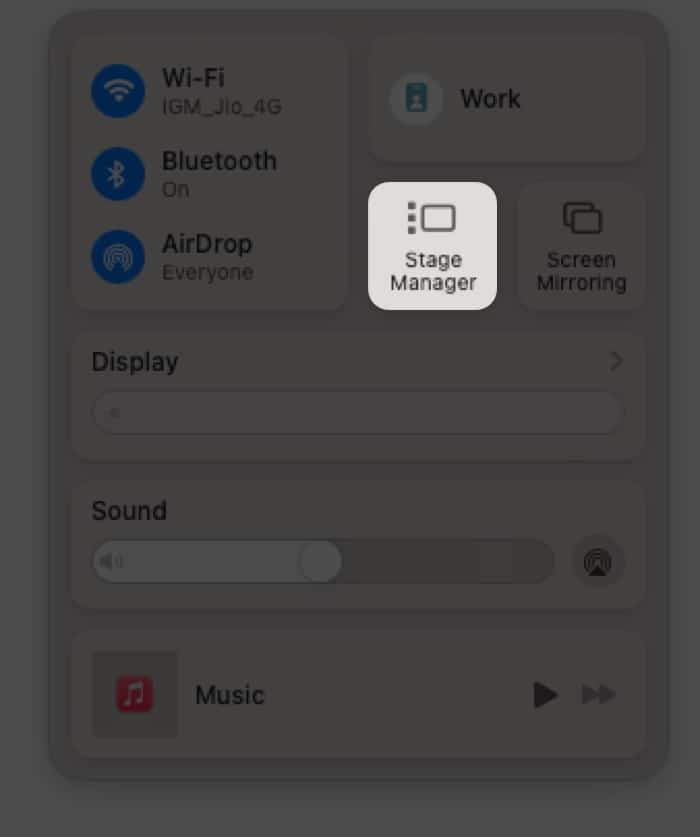
Via Control Center
- Open Control Center from the menu bar.
- Click the Stage Manager icon to enable/disable it.
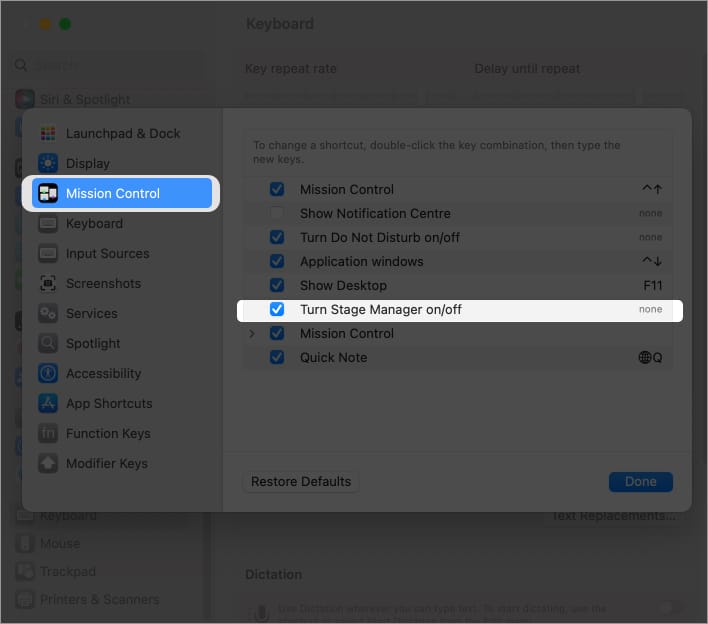
Set a keyboard shortcut to turn Stage Manager on/off
- Go to Apple menu → System Settings → Keyboard.
- Click the Keyboard Shortcuts button.
- Here, select Mission Control.
- Double-click the ‘none‘ next to the Stage Manager.
- Give the desired keyboard shortcut.
- Tap Done.
Now, the Stage Manager will be enabled or disabled when you use this keyboard shortcut.
Show or hide Stage Manager from the Mac menu bar
You can add Stage Manager to Mac’s menu bar for even easier access. Simply drag the Stage Manager icon from the Control Center and drop it on the menu bar. To remove it, hold the Command (⌘), click, drag, and drop the icon anywhere on the desktop.
Or you can go to the Apple menu → System Settings → Control Center → click the pop-up menu next to Stage Manager → select Menu Bar or Don’t Show in Menu Bar.
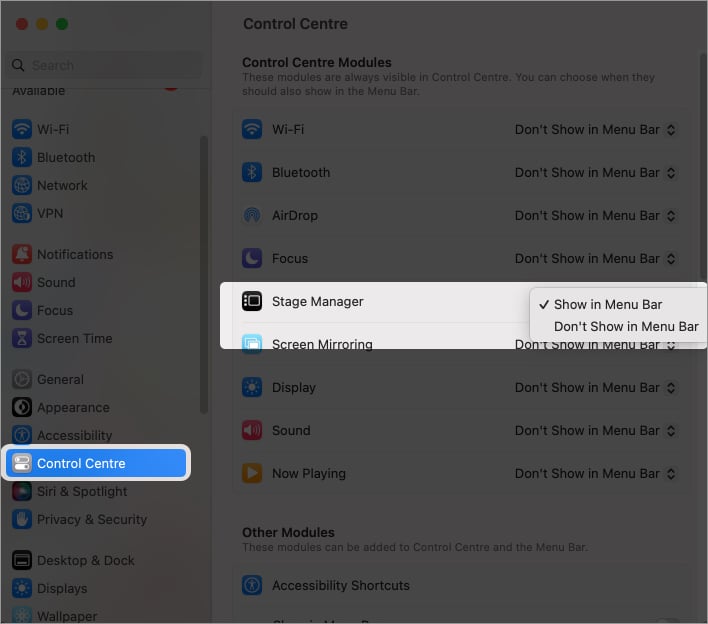
Once in the menu bar, you can click the Stage Manager icon and then Toggle it on/off accordingly. If you want to customize, click Stage Manager Settings.
Change Stage Manager settings
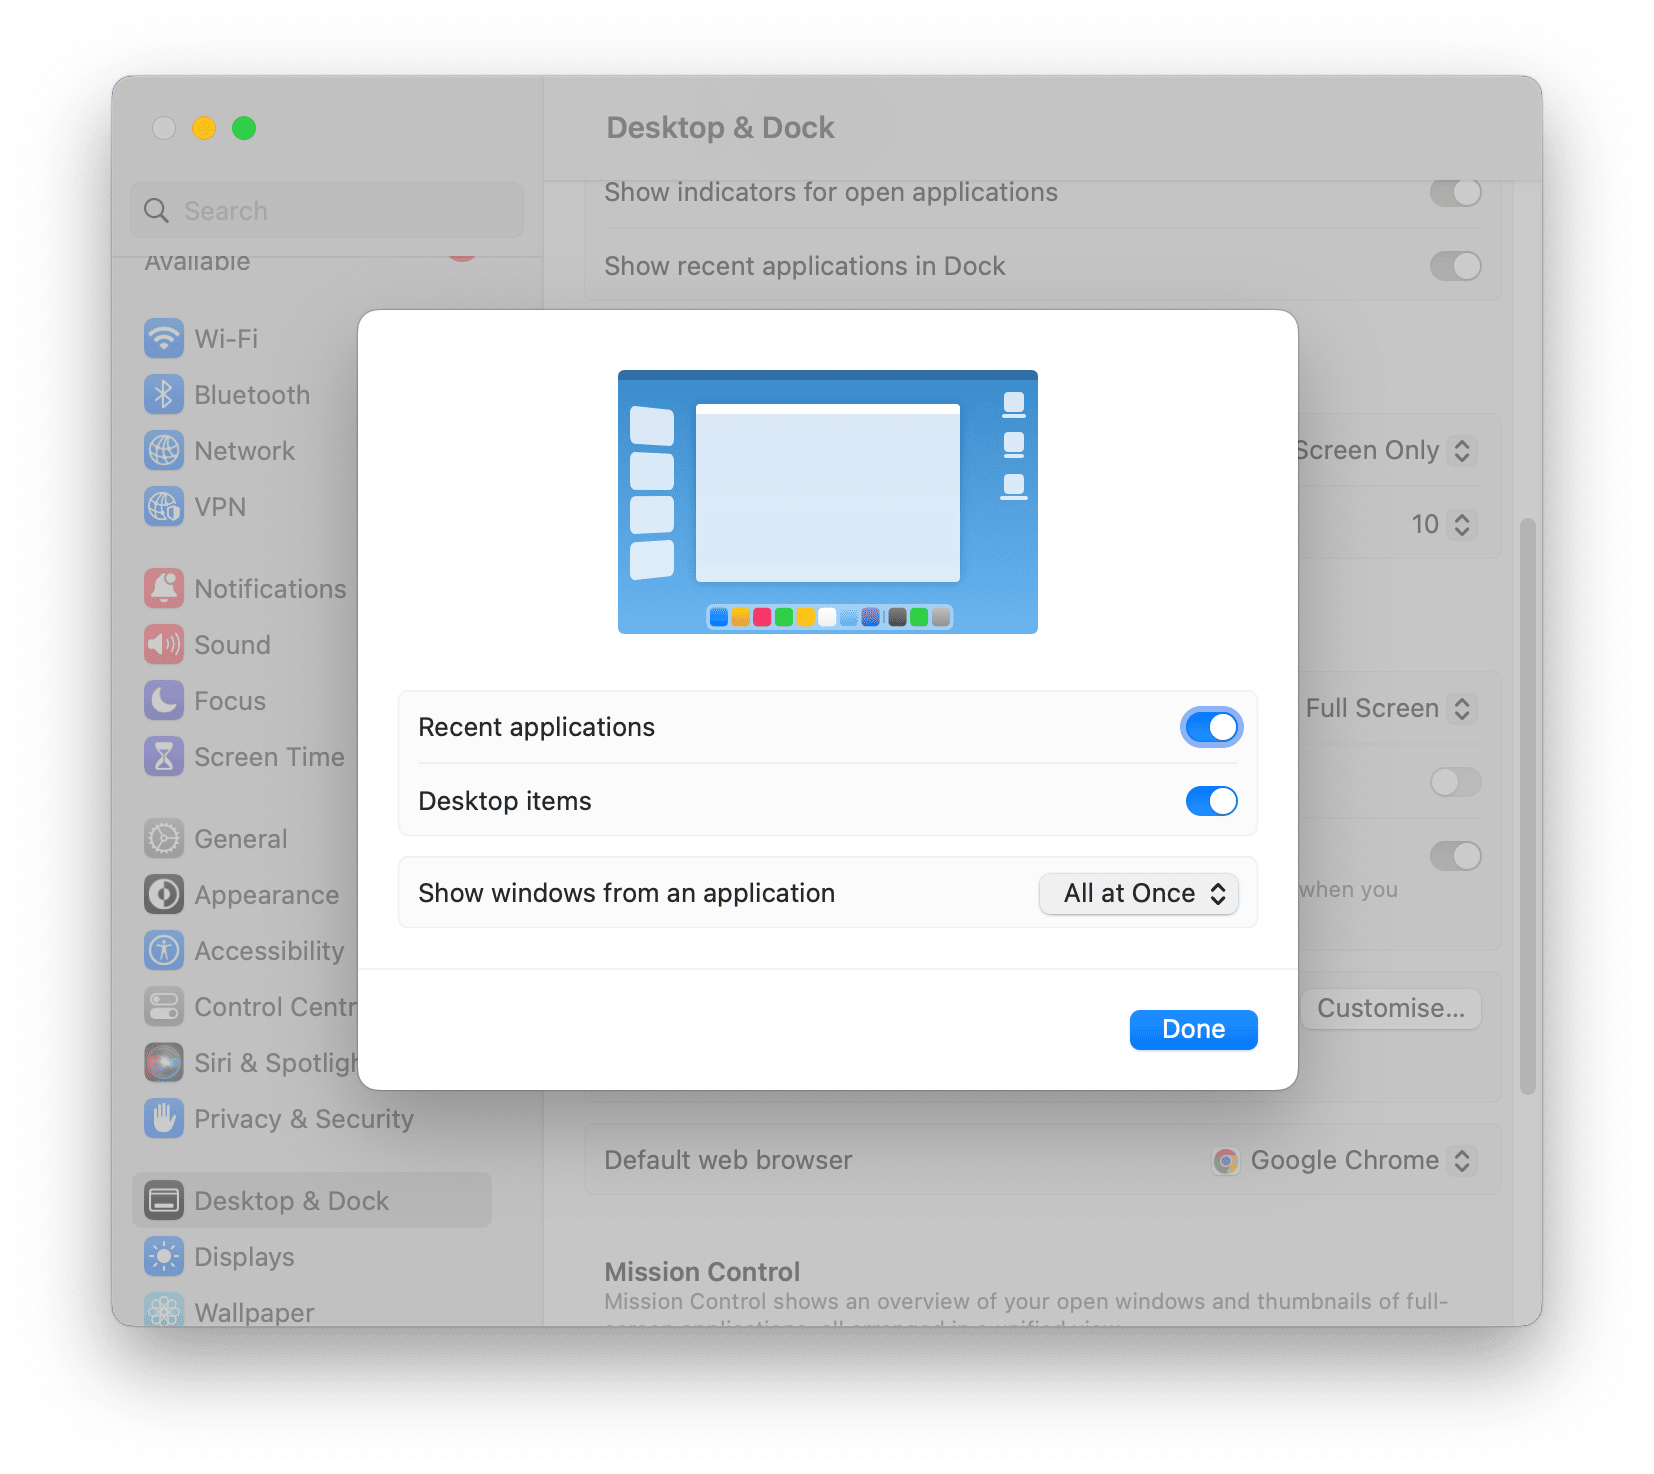
- Go to Apple menu → System Settings → Desktop & Dock.
- Click Customize next to Stage Manager.
- Here you can toggle on/off,
- Recent applications – Shows recently used apps on the left side.
- Desktop items – Show items present on the desktop.
- Next, click the menu next to Show windows from an application, and select,
- All at Once – To see all active windows of an app on the same screen.
- One at a Time – Show only the most recently used window of an app on the screen. (You can get other windows by clicking on them from the left)
- Click Done to exit the menu.
Organize Mac desktop with Stage Manager
Note:
- When ‘Recent applications’ is disabled, you can move the pointer to the screen’s left edge to briefly see the recent apps.
- Full-screen and split-screen windows get their own space outside of Stage Manager. You can access them via swiping left/right with three/four fingers or Mission Control.
Group apps – Open the app you want to add. Now launch the group, drag the app from the Recent applications section and drop it in the center of the screen. You can also press the Shift key and click the window’s thumbnail to group it with currently open apps.
Ungroup apps – Drag the app you want to remove and drop it on the left side of the screen (in the center of the screen).
To hide/unhide an app – Go to the app window and press Command (⌘)+H. Now you won’t see the app in the recent apps section. To get back the app, click it from the Dock or press Command (⌘)+Tab, tab again to select the app, and then leave the keys.
Reposition or overlap windows – Click anywhere on the title bar and drag and drop it at the desired location. You can also overlap windows.
Resize windows – Hover the cursor at the edge of the app window. When you see the resize arrow, click and drag the window’s edge to resize; lift the finger once the window is resized.
Manage multiple windows
Switch apps – Bring the Recent Application section (if hidden) and click the app you want on the main screen.
Switch between windows of the same app – Click the Command (⌘) + character key (Left of number 1)
Minimize windows – Basically, this sends the window to the side as a thumbnail without switching windows. Simply click the – (minus icon) or press Command (⌘)+ M
Drag and Drop between apps – Select and drag the items to the left side of the screen and hover the cursor over the app to transfer. As the app comes to the center, drop the items here. If there are multiple windows, hover the cursor over the rear window, and drop the items when the app window moves to the front.
How to use Stage Manager in iPadOS 16
Thankfully, Apple no longer restricts the Stage Manager to iPads with M series chips. You can use the feature as long as you have iPadOS 16 and:
- iPad Air (5th generation)
- 11-inch iPad Pro(all generations)
- iPad Pro 12.9-inch (3rd generation and later)
Enable or disable Stage Manager on iPad
Via Settings
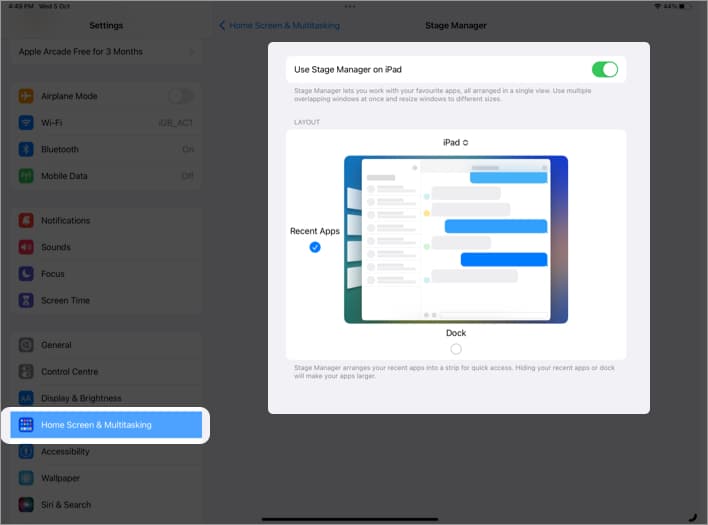
- Launch Settings → Home Screen & Multitasking.
- Tap Stage Manager.
- Toggle on/off Use Stage Manager on iPad.
- Here, you can also check/uncheck
- Recent Apps – To allow/disable recent apps from appearing on the left side.
- Dock – To unhide/hide Dock when Stage Manager is active.
Via Control Center
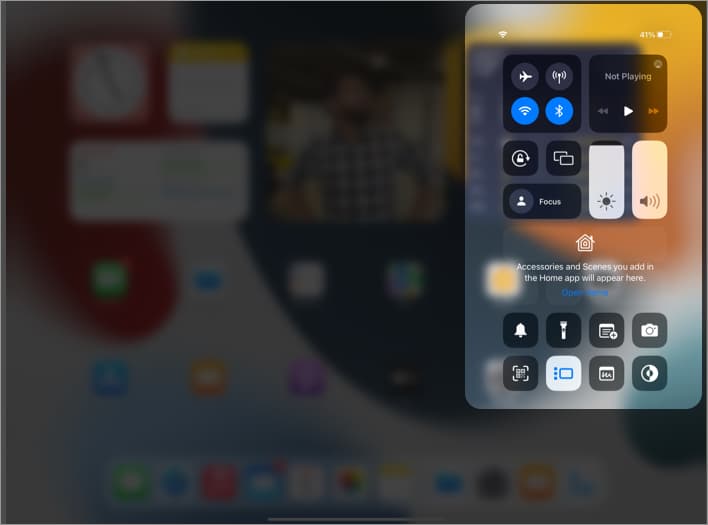
- Open Control Center.
- Tap the Stage Manager icon.
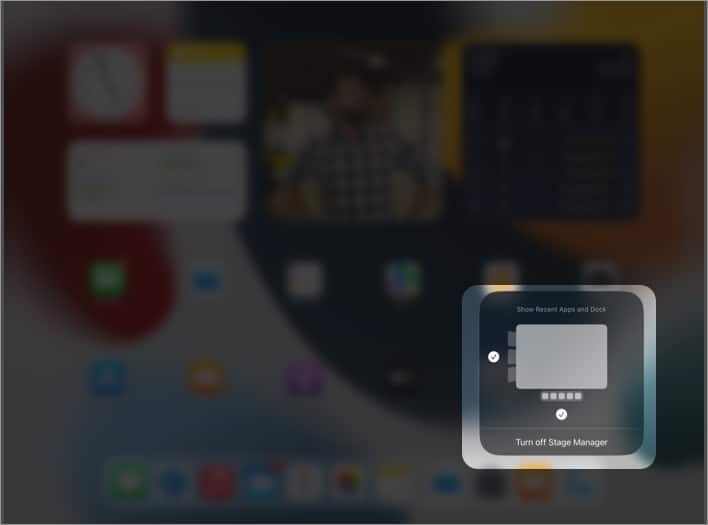
When enabled, the icon’s background turns white. - To change Stage Manager’s settings, hard-press the icon.
- Now, check/uncheck
- Recent apps
- Dock
Note: If you can’t see the Stage Manager icon in the Control Center, go to Settings → Control Center → tap + next to the Stage Manager.
Multitask with multiple windows on iPad with Stage Manager
Make app groups – You can use any o
- Tap the three-dot-icon at the top of a window and select Add Another Window. You’ll now see all recent app windows; select the one you want to group.
- Drag and drop the app from the Dock to the center of the screen.
(If the Dock isn’t visible, swipe up from the bottom edge of the screen) - Hold and drag the app from the Recent apps list, and drop it to the center of the screen.
Resize any window – Drag the dark curve at the left or right bottom inward or outward, then lift the finger to resize the app. If using a mouse or trackpad, hover the cursor to any edge, and drag in/out when you see the resize arrow.
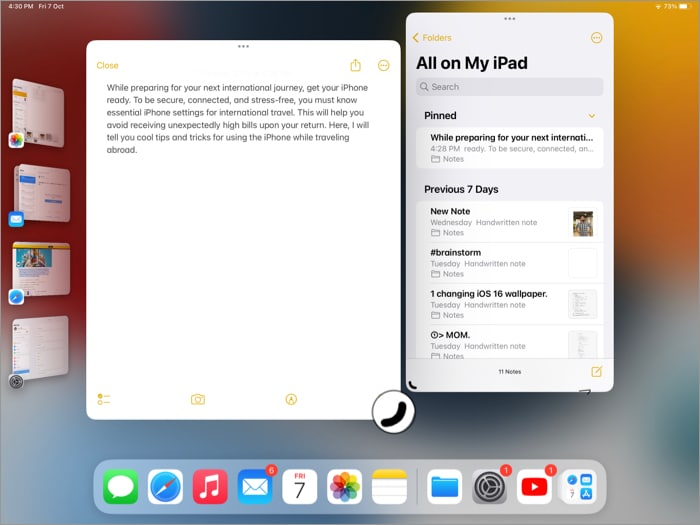
Move a window to the Recent apps list – Like macOS, you just have to minimize the window. Tap the three-dot-icon and choose Minimize.
Maximize the window – Tap the three-dot-icon and select Zoom.
Reposition a window – Touch, hold, drag the title bar, then drop it at the desired location.
Switch between apps – You can tap another app from the Recent apps list or Dock. The current group of apps instantly moves to the left side, replaced by your desired app. You can also swipe left or right with four or five fingers.
See all active apps – Open App Switcher (swipe up from the bottom of the screen and pause in the center).
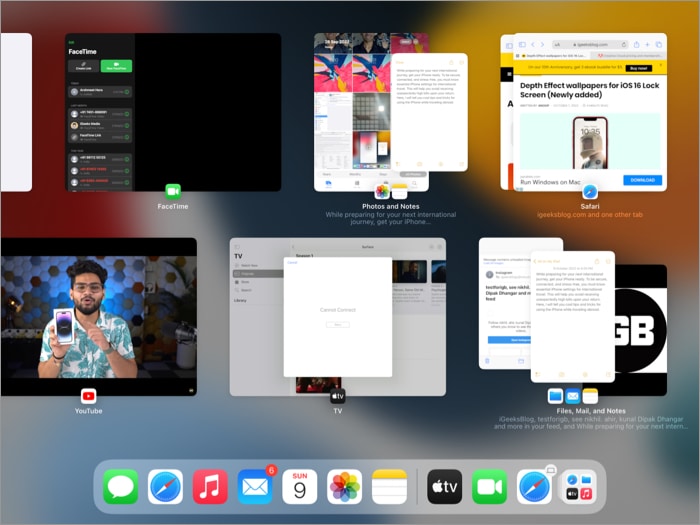
See all active windows of the same app
- Long-press the app icon from Dock, and select Show All Windows.
- Tap the app icon from the Recent Apps list.
- Invoke App Switcher and tap the app icon.
FAQs
You can use the iPad as a second display for a Mac by using the AirPlay feature. With that, you can control the iPad and Mac together.
No. Stage Manager will be available for every Mac that will get the latest macOS 13 Ventura update.
That’s it!
Stage Manager will change how we multitask on our Mac and iPad. By the way, how many apps are in your background while reading this guide? Let me know in the comments.
Use Stage Manager on iPad & Mac Like a PRO 🔥
More Mac and iPad guides for you:
- 7 Ways to fix CoreServicesUIAgent verifying stuck on Mac
- iPad touch screen not working? 11 Working fixes
- How to prepare your Mac for macOS Ventura
- How to set a video as a screensaver on Mac
Anoop loves to find solutions for all your doubts on Tech. When he's not on his quest, you can find him on Twitter talking about what's in his mind.
